Quilting as you go Quilt

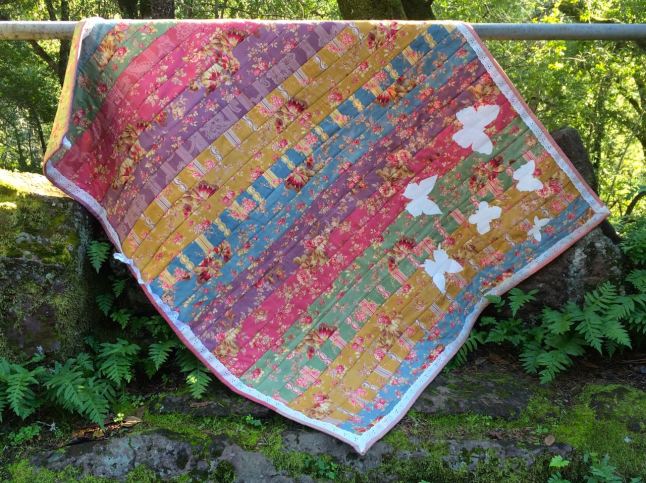
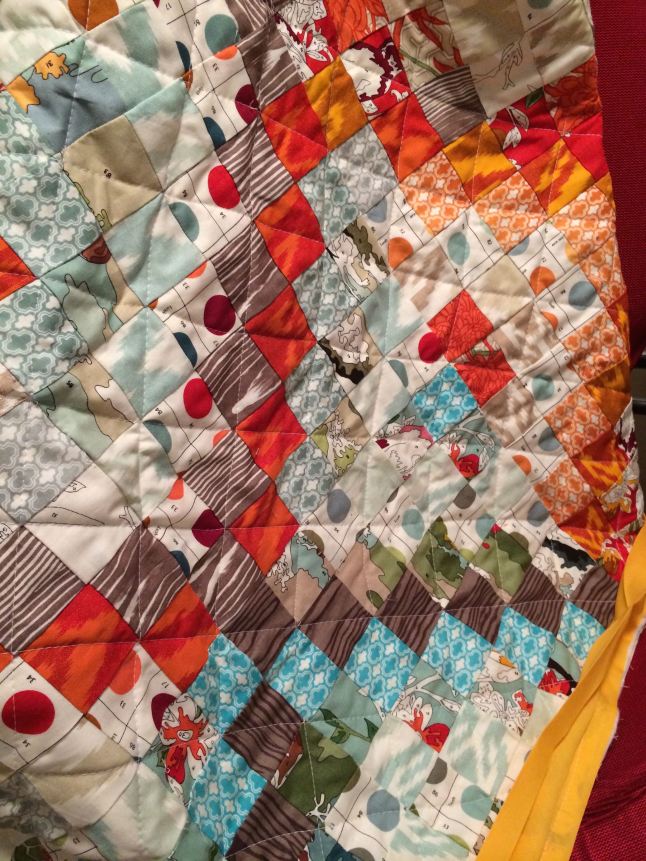
A while a go I saw one of these ‘quilt as you go’ quilts pop up in my Pinterest feed. It was a little shaggy and pastel so I sort of ignored it. But the idea stuck and when I picked up a nice jelly roll of florals (not normally my thing) I thought it would be nice to try out.  I followed some basic instructions here A Cuppa and a Catchup – this wasn’t the one I originally saw but what Google brought me when I searched. She doesn’t use a jelly roll for her’s but the concept was the same.

butterfly1

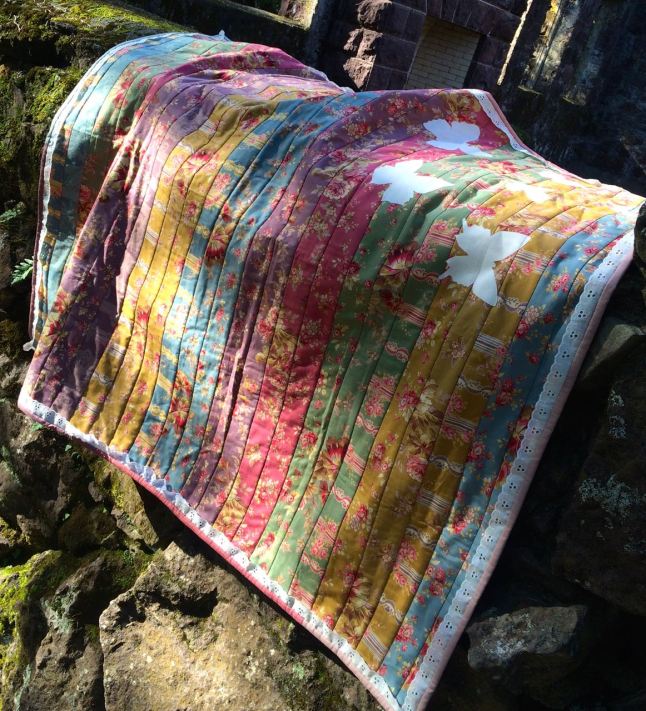
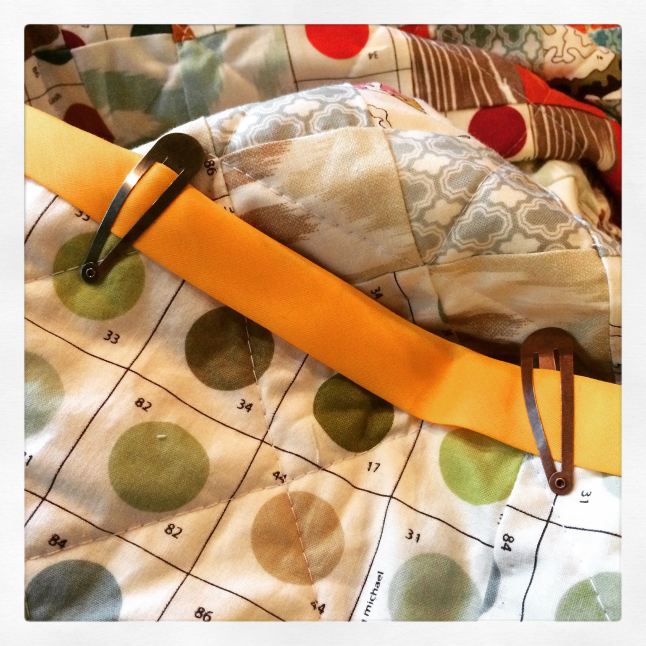
As you can imagine – the quilt is super fast. The only issue was that you end up with a lot of vertical stripes. To add a little interest, I inserted a eyelet lace border into the binding and some appliquéd butterflies into the corner. I am VERY happy with those butterflies.

butterfly3

We took the quilt out to Jack London State Park and photographed it at the Wolf House. The boy is just finishing The Lost Hero which has it’s climactic fight at the ruins. It’s awesome, go check it out.

butterfly2


Fancy Foxes

You wan to know what the most fun quilt ever is: Elizabeth Hartman’s Fancy Foxes. Yay, now you know.

fancyfox2

Sadly blurry 😦

I made this one for a friend’s first baby. I knew the mom-to-be was a veterinarian and that they had rescued more than one wild creature from their backyard. I figured I couldn’t go wrong an animal theme. Plus, I’d been eyeing that fox pattern for a while

fancyfox1

Making each little fox face became a bit obsessive  – “just one more and I’ll go to see” – level obsessive. I think that red/orange one is my favorite

fancyfox3

No, maybe the polka-dot one.

fancyfox5

Or.. oh I don’t know. I love them all.

Portrait Session… for a Stuffie

A good friend runs a lovely website called hello, Wonderful. I follow it on Facebook and find lots of interesting ideas that I never seem to find the time to act upon. Last week she linked to a blog that linked to a blog… well, you know how it goes. Eventually we get to Willowday and this awesome idea. The idea is that you will capture a beloved stuffie in a photo before life turns that stuffie into fabric parts.

We just did this project last weekend. Bear is a dear, pensive looking friend and my son and I both loved taking his picture.

bear portrait

I edited the photo to be black and white and had it printed at 12 x 12 at a professional photo printing lab (Dickerman Prints for those in SF). To frame up nicely, I cropped the photo tighter using their online tool. I had the largest Bear portrait printed at 12″ x 12″ mainly because we already had a frame that size. It was super useful as my original photo was not a standard print size.

I printed 4 photos. 2 of Bear and 2 of the boy. For now the framed photo is hanging over our fireplace. I had a lot of trouble getting a good photo of the final project (lots of reflections happening off the glass) but trust me that it looks great.

bear portrait


The others I had printed at 8″ x 10″. I think I have a couple of frames to use but I might hunt around a bit before committing. This is my favorite that I’m thinking of framing up next.

Bear and Boy

Improv Hexie

Hexie

One to file under “things that are finished” – it’s an improvisational giant hexagon with scrappy borders. I started working on large-ish panels of fabrics that I liked without much of a plan. I first thought I’d do a stack of coins quilt but I have made one of those before and the idea of a very large hexagon was interesting. I figured that since I had no plan, doing something strictly because it was interesting was a fine plan.

Large hex

I tried to use every scrap of the panels that I could. Most lined up in haphazard but pleasing ways and even the ones that didn’t fit added something. As you can see there are no pictures of the back… that would be because it’s a freaking mess. Really, so many mistakes that are just lazy and careless. The quilting is freestyle squares which isn’t great but wouldn’t be terrible if I had pinned better. There are some folds on the back. Serious, serious folds.  I fixed a couple that I could easily get to but one is just too much. Oh well, I’m happy with the quilt top if nothing else. I was hoping to give it as a baby quilt but with the back as it is I think it may need to be a picnic blanket.

Pros:

  • Good color/pattern choices
  • Fun improv top

Cons:

  • Terrible sandwich making
  • Lazy quilting
  • Not sure I can give it to anyone with the back all janky 😦

Trippy

This is my first quilt I’ve really, really finished in quite some time. I used the Trip Around the World instructions here and a fully jelly roll of Uptown Lush that has been sitting in the stash for a while. It’s finished off with straight diagonal quilting. So the squares aren’t perfect… or really even close.  And the “straight” line quilting is wobbly.  But it feel so nice to finish.

miniquilt1

I forgot how much I love hand binding.

miniquilt2

the back with bonus climber

miniquilt5

The final product:

miniquilt3 miniquilt4

Marsala? Ok Ok

Last year I did the Pantone Quilt challenge and it was awesome.  Radiant Orchid wasn’t exactly my type of color but I loved the weird psychedelic forest I made out of it and had a great time.  This year’s color is Marsala… even harder to work with.  But I’m game! I’m into it! Yeehaa!

Now, what the hell am I going to make?

I FEAR NO MARSALA 

See, that stash is totally worth it

You know those City Gym Shorts that everyone and their sister has pinned to Pinterest? I made them.  And they are awesome.  And you want to make them, too.  Gym shorts for everyone!  Even those of us who haven’t been inside a gym in years. I used an unknown cotton lawn that has been in my stash forever, some red lawn I found in the remnants bin, and a thin red double fold bias tape.  The whole thing took just a few hours and I love, love them. I plan to wear them on the beach in Hawaii next month (oh yeah, we’re going to Hawaii next month).

citygymshorts2

See the cuteness.

citygymshorts1


Check out the detail!

Kids Clothes Week – Bobby’s Bathers Shorts

I will admit I didn’t really plan to participate in KCW this summer.  I have a bunch of other projects going on, some I am super behind on and the boy has been lukewarm on hand-mades.  Then I saw Miss Mucho’s post and I wanted to play along.  She always convinces me to do things thinking mine will turn out as great as hers.  That never happens.

For this project I used a light chambray for the main fabric and touches of some Star Wars quilting cotton I picked up at Beverly’s awhile ago.  The pattern is Bobby’s Bathers – a boys swim trucks pattern – in Sewing For Boys. I have made so many things from that book, it nearly justifies all the sewing books I have bought and never made a thing.

star wars shorts


The biggest issue I have seen so far is the fabric wrinkles very easily.  I ironed last night to take photos in the morning.  Just sitting on the dresser overnight put in that crease under Darth Vader’s pocket.

starwarsshorts2


Did you see the pockets? The are fussy cuts of Darth Vader and a Storm Trooper.  Each has a velcro closure sewn in to keep important valuables (read: lego Star Wars mini-figs) inside.

starwarsshorts3


Since theses were originally a swimsuit pattern, the waist has a tabbed tie closure.  I liked the pop of color. I had a difficult time figuring out where the tabs were supposed to go and ended up ripping them out and adding them back on after the shorts were sewn together, just before making the elastic casing.

starwarsshorts4

There isn’t a good picture in the book of what they are supposed to look like, so I just did what made sense to me.  All the ripping and repositioning (and that my machine only wanted to make one button hole for whatever reason) resulted in a little funky sewing here but that is the joy of sewing for kids.  They really don’t care.

Pros: Fast, cute, might actually be worn, Star Wars

Cons: Wrinkled fabric, funky tabs


Dirndl Skirt for Palm Springs

Back in the spring, our family took a little trip to Palm Springs.  I wanted to make something light and fun and somewhat retro for the trip.  My fantasy involved sipping cocktails on the patio like a modern lady in my desert oasis [the Ace Hotel – I would live here if I could]. This simple dirndl skirt (I used Gertie’s basic pattern here) seemed just about right.  The fabric is a basic cotton and I think I had about 2 1/4 yards.  I used every last bit of the length – I like my skirts full – and used the extra from the width to make the waist band.

dirndl1

All I need is my pearls and I’m ready to be a good ’50s homemaker.

dirndl2

I really like the deep hem. This one is about 2 1/2 inches and I think it would be even better in a heavier fabric.  I want to try this in some other fabric.  The gathers at the waist poof a bit in this cotton.  I think a little weight would give it a bit more structure.  I did end up wearing this to work today (with less crazy shoes) and a cardigan so I guess it does double duty – Palm Springs starlet and code monkey… what more could you ask out of skirt.

The Good: cute fabric, easy sewing

The Bad: cotton needs to be ironed every time, I didn’t do the best job with the gathers.


Portrait Blouse Wearable Muslin

I’m not a fan of making muslins. I really don’t have enough time to make two versions of everything I want so… yeah… I just don’t do that. In this case, I found 1.5 yards of a basic blue cotton voile in the remnants bin at Stone Mountain and Daughter and decided to make a “first attempt” muslin with it. I full intended to (and have) worn this out and about.

The pattern is the Portrait Blouse from Gertie’s New Book for Better Sewing. I made a small adjustment to increase the bust size but otherwise followed the pattern. I think for round two I will lengthen the blouse a bit. I don’t often tuck my shirts in and I need a bit more wiggle room between the top of my pants and the bottom of my top to avoid accidental tummy showing (see photo – thank you retouch tool).

portrait3


Why am I about to laugh?

Why am I about to laugh?

oh, that's why

oh, that’s why